How to optimize your Spark Cluster with Interactive Spark Jobs

In this article, you will learn:
- How to decrease your spark job execution time
- What is an interactive job in Ilum
- How to run an interactive spark job
- Differences between running a spark job using Ilum API and Spark API
Ilum job types
There are three types of jobs you can run in Ilum: single job, interactive job and interactive code. In this article, we'll focus on the interactive job type. However, it's important to know the differences between the three types of jobs, so let's take a quick overview of each one.
With single jobs, you can submit code-like programs. They allow you to submit a Spark application to the cluster, with pre-compiled code, without interaction during runtime. In this mode, you have to send a compiled jar to Ilum, which is used to launch a single job. You can either send it directly, or you can use AWS credentials to get it from an S3 bucket. A typical example of a single job usage would be some kind of data preparation task.
Ilum also provides an interactive code mode, which allows you to submit commands at runtime. This is useful for tasks where you need to interact with the data, such as exploratory data analysis.
Interactive job
Interactive jobs have long-running sessions, where you can send job instance data to be executed right away. The killer feature of such a mode is that you don’t have to wait for spark context to be initialized. If users were pointing to the same job id, they would interact with the same spark context. Ilum wraps Spark application logic into a long-running Spark job which is able to handle calculation requests immediately, without the need to wait for Spark context initialization.
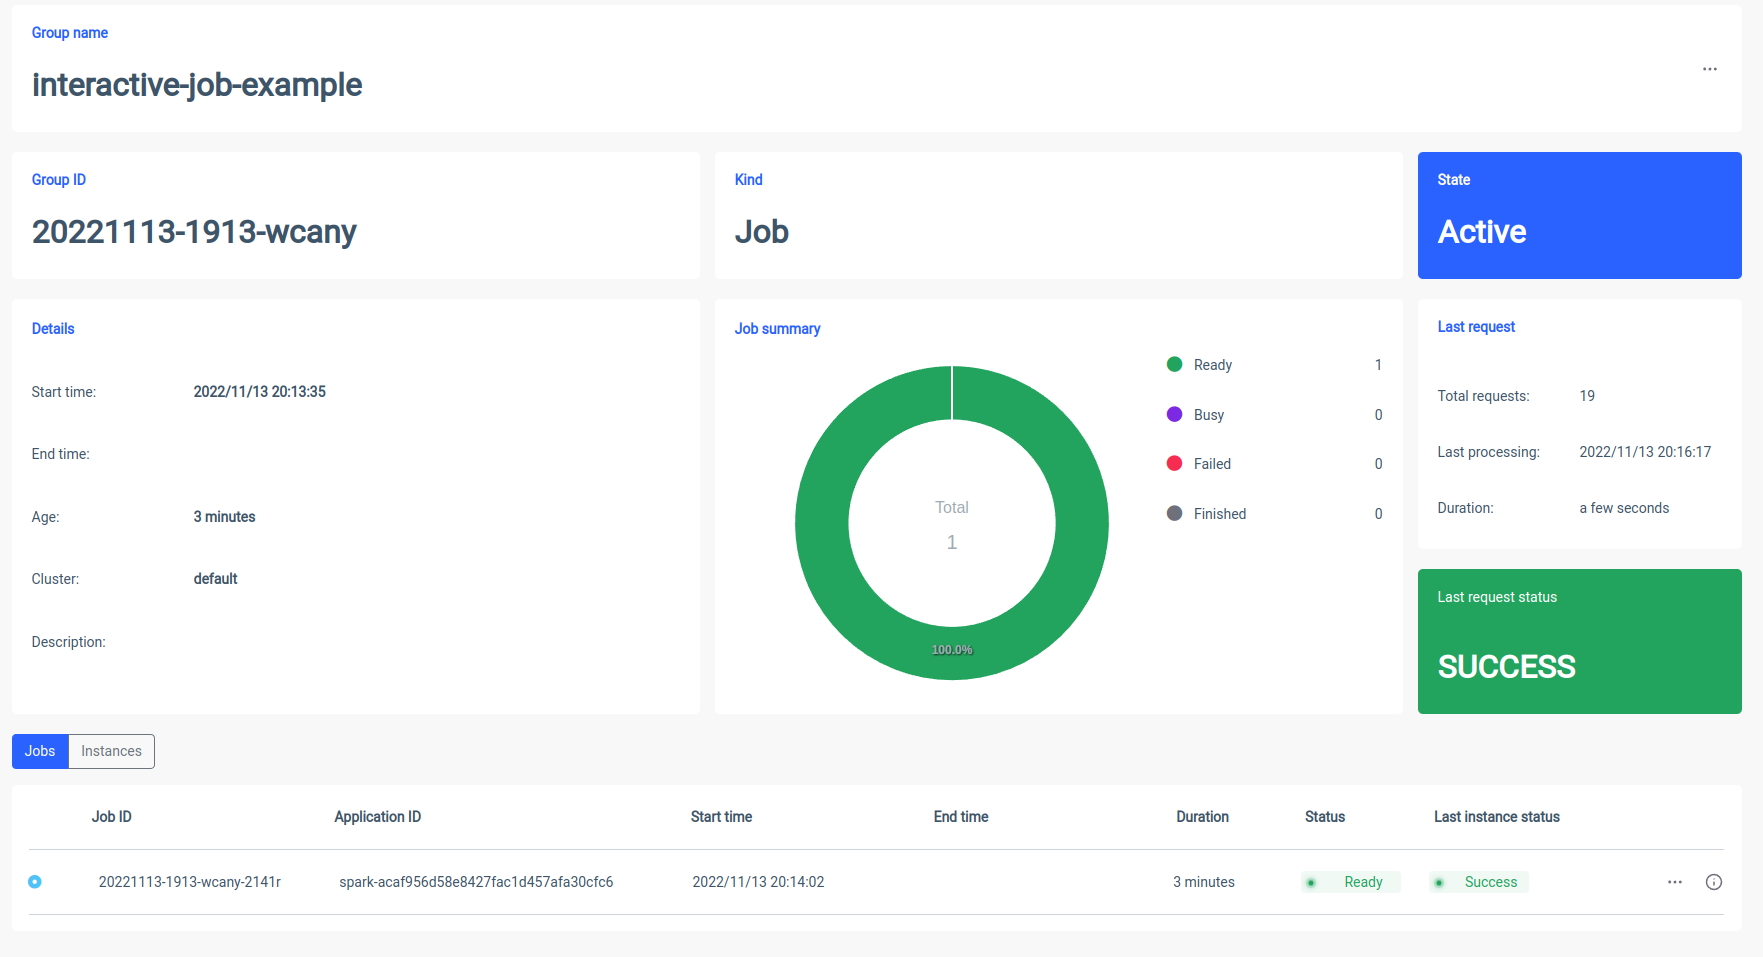
Starting an interactive job
Let’s take a look at how Ilum’s interactive session can be started. The first thing we have to do is to set up Ilum. You can do it easily with the minikube. A tutorial with Ilum installation is available under this link. In the next step, we have to create a jar file which contains an implementation of Ilum's job interface. To use Ilum job API, we have to add it to the project with some dependency managers, such as Maven or Gradle. In this example, we will use some Scala code with a Gradle to calculate PI.
The full example is available on our GitHub.
If you prefer not to build it yourself, you can find the compiled jar file here.
The first step is to create a folder for our project and change the directory into it.
$ mkdir interactive-job-example
$ cd interactive-job-example
If you don’t have the newest version of Gradle installed on your computer, you can check how to do it here. Then run the following command in a terminal from inside the project directory:
$ gradle initChoose a Scala application with Groovy as DSL. The output should look like this:
Starting a Gradle Daemon (subsequent builds will be faster)

Select type of project to generate:
  1: basic
  2: application
  3: library
  4: Gradle plugin
Enter selection (default: basic) [1..4] 2

Select implementation language:
  1: C++
  2: Groovy
  3: Java
  4: Kotlin
  5: Scala
  6: Swift
Enter selection (default: Java) [1..6] 5

Split functionality across multiple subprojects?:
  1: no - only one application project
  2: yes - application and library projects
Enter selection (default: no - only one application project) [1..2] 1

Select build script DSL:
  1: Groovy
  2: Kotlin
Enter selection (default: Groovy) [1..2] 1

Generate build using new APIs and behavior (some features may change in the next minor release)? (default: no) [yes, no] no
Project name (default: interactive-job-example):
Source package (default: interactive.job.example):

> Task :init
Get more help with your project: https://docs.gradle.org/7.5.1/samples/sample_building_scala_applications_multi_project.html

BUILD SUCCESSFUL in 30s
2 actionable tasks: 2 executed
Now we have to add the Ilum repository and necessary dependencies into your build.gradle file. In this tutorial, we will use Scala 2.12.
dependencies {
    implementation 'org.scala-lang:scala-library:2.12.16'
    implementation 'cloud.ilum:ilum-job-api:5.0.1'
    compileOnly 'org.apache.spark:spark-sql_2.12:3.1.2'
}
Now we can create a Scala class that extends Ilum’s Job and which calculates PI:
package interactive.job.example

import cloud.ilum.job.Job
import org.apache.spark.sql.SparkSession
import scala.math.random

class InteractiveJobExample extends Job {

  override def run(sparkSession: SparkSession, config: Map[String, Any]): Option[String] = {

    val slices = config.getOrElse("slices", "2").toString.toInt
    val n = math.min(100000L * slices, Int.MaxValue).toInt
    val count = sparkSession.sparkContext.parallelize(1 until n, slices).map { i =>
      val x = random * 2 - 1
      val y = random * 2 - 1
      if (x * x + y * y <= 1) 1 else 0
    }.reduce(_ + _)
    Some(s"Pi is roughly ${4.0 * count / (n - 1)}")
  }
}
If Gradle has generated some main or test classes, just remove them from the project and make a build.
$ gradle buildGenerated jar file should be in './interactive-job-example/app/build/libs/app.jar', we can then switch back to Ilum. Once all pods are running, please make a port forward for ilum-ui:
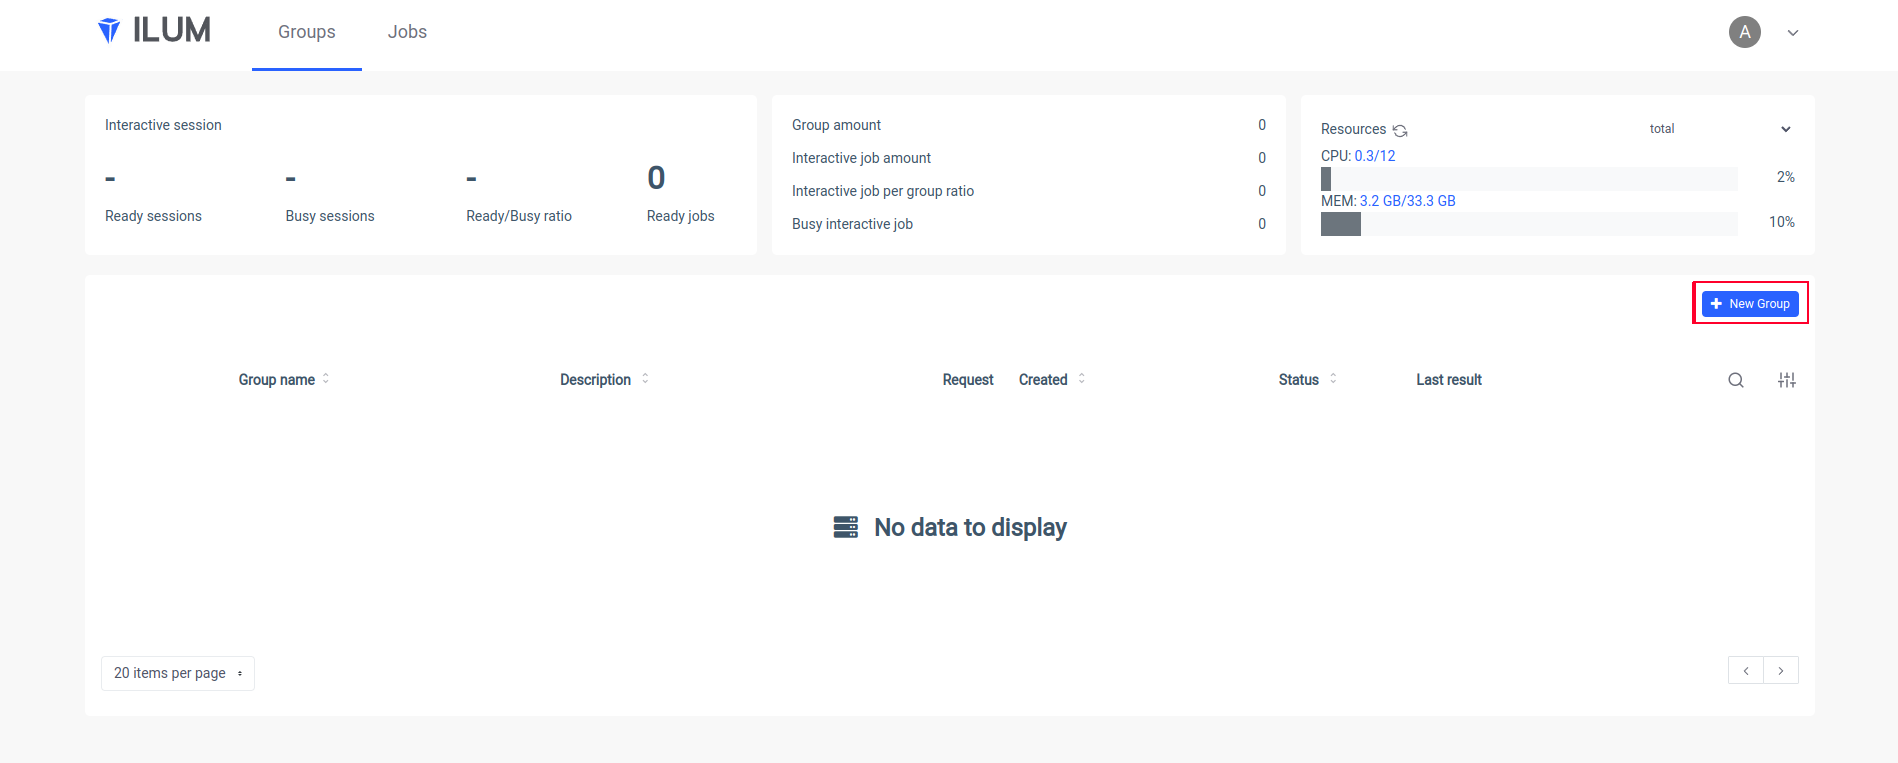
kubectl port-forward svc/ilum-ui 9777:9777Open Ilum UI in your browser and create a new group:
Put a name of a group, choose or create a cluster, upload your jar file and apply changes:
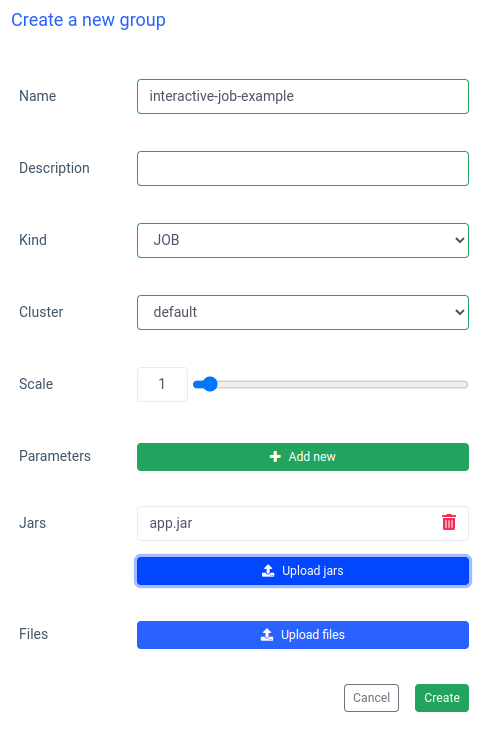
Ilum will create a Spark driver pod and you can control the number of spark executor pods by scaling them. After the spark container is ready, let’s execute the jobs:

Now we have to put the canonical name of our Scala class
interactive.job.example.InteractiveJobExampleand define the slices parameter in JSON format:
{
  "config": {
    "slices": "10"
  }
}
You should see the outcome right after the job started
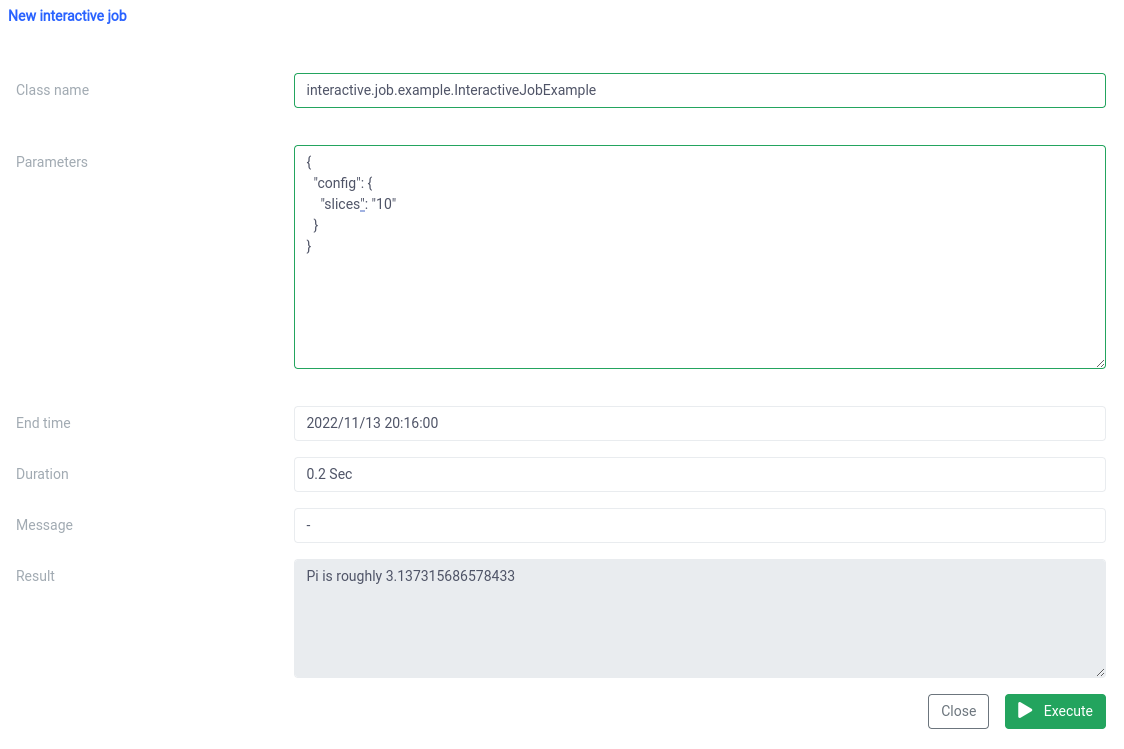
You can change parameters, and rerun a job and your calculations will occur on the spot.
Interactive and single job comparison
In Ilum you can also run a single job. The most important difference compared to interactive mode is that you don’t have to implement the Job API. We can use the SparkPi jar from Spark examples:
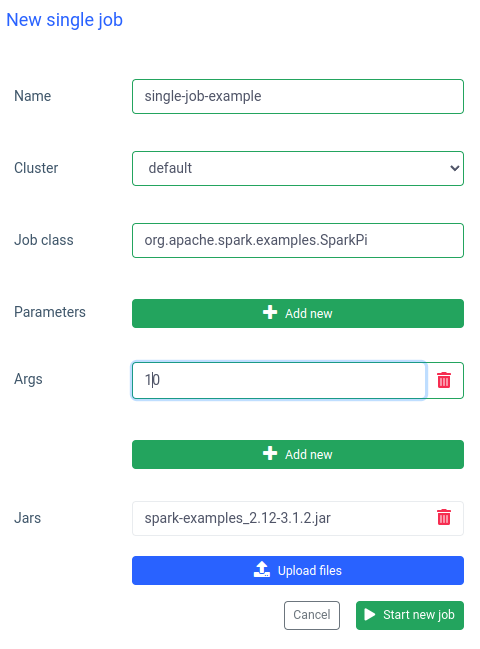
Running a job like this is also quick, but interactive jobs are 20 times faster (4s vs 200ms). If you would like to start a similar job with other parameters, you will have to prepare a new job and upload the jar again.
Ilum and plain Apache Spark comparison
I've set up Apache Spark locally with a bitnami/spark docker image. If you would like also to run Spark on your machine, you can use docker-compose:
$ curl -LO https://raw.githubusercontent.com/bitnami/containers/main/bitnami/spark/docker-compose.yml
$ docker-compose up
Once Spark is running, you should be able to go to localhost:8080 and see the admin UI. We need to get the Spark URL from the browser:
Then, we have to open the Spark container in interactive mode using
$ docker exec -it <containerid> -- bashAnd now inside the container, we can submit the sparkPi job. In this case, will use SparkiPi from the examples jar and, as a master parameter, put the URL from the browser:
$ ./bin/spark-submit --class org.apache.spark.examples.SparkPi\
  --master spark://78c84485d233:7077 \
  /opt/bitnami/spark/examples/jars/spark-examples_2.12-3.3.0.jar\
  10
Summary
As you can see in the example above, you can avoid the complicated configuration and installation of your Spark client by using Ilum. Ilum takes over the work and provides you with a simple and convenient interface. Moreover, it allows you to overcome the limitations of Apache Spark, which can take a very long time to initialize. If you have to do many job executions with similar logic but different parameters and would like to have calculations done immediately, you should definitely use interactive job mode.

Similarities with Apache Livy
Ilum is a cloud-native tool for managing Apache Spark deployments on Kubernetes. It is similar to Apache Livy in terms of functionality - it can control a Spark Session over REST API and build a real-time interaction with a Spark Cluster. However, Ilum is designed specifically for modern, cloud-native environments.
We used Apache Livy in the past, but we have reached the point where Livy was just not suitable for modern environments. Livy is obsolete compared to Ilum. In 2018, we started moving all our environments to Kubernetes, and we had to find a way to deploy, monitor and maintain Apache Spark on Kubernetes. This was the perfect occasion to build Ilum.
