Deploying PySpark Microservice on Kubernetes: Revolutionizing Data Lakes with Ilum.

Greetings Ilum enthusiasts and Python fans! We're thrilled to unveil a new, eagerly expected feature that's set to empower your data science journey - full Python support in Ilum. For those in the data world, Python and Apache Spark have long been an iconic duo, seamlessly handling vast volumes of data and complex computations. And now, with Ilum's latest upgrade, you can harness the power of Python right inside your favourite data lake environment.
This blog post is your guided tour to exploring this feature. We'll kick things off with a simple Apache Spark job written in Python, run it on Ilum, and then dive deeper. We'll transform the initial code to support an interactive mode, offering you direct access to the Spark job via Ilum's API. By the end of this journey, you'll have a Python-based microservice responding to API calls, all running smoothly on Ilum.
So, are you ready to enhance your data game with Python and Ilum? Let's get started.
All examples are available on our GitHub repository.
Step 1: Writing a Simple Apache Spark Job in Python.
Before we embark on our Python journey with Ilum, we need to ensure our environment is well-equipped. To run a Spark job, you need to have Ilum and PySpark installed. You can use pip, the Python package installer, to set up PySpark. Make sure you're using Python >=3.9.
pip install pysparkFor setting up and accessing Ilum, please follow the guidelines provided here.
1.1 SparkPi example.
Now, let's dive into writing our Spark job. We'll start with a simple example of SparkPi
import sys
from random import random
from operator import add

from pyspark.sql import SparkSession

if __name__ == "__main__":
    spark = SparkSession \
        .builder \
        .appName("PythonPi") \
        .getOrCreate()

    partitions = int(sys.argv[1]) if len(sys.argv) > 1 else 2
    n = 100000 * partitions

    def f(_: int) -> float:
        x = random() * 2 - 1
        y = random() * 2 - 1
        return 1 if x ** 2 + y ** 2 <= 1 else 0

    count = spark.sparkContext.parallelize(range(1, n + 1), partitions).map(f).reduce(add)
    print("Pi is roughly %f" % (4.0 * count / n))

    spark.stop()
Save this script as ilum_python_simple.py
With our Spark job ready, it's time to run it on Ilum. Ilum offers the capability to submit jobs using the Ilum UI or through the REST API.
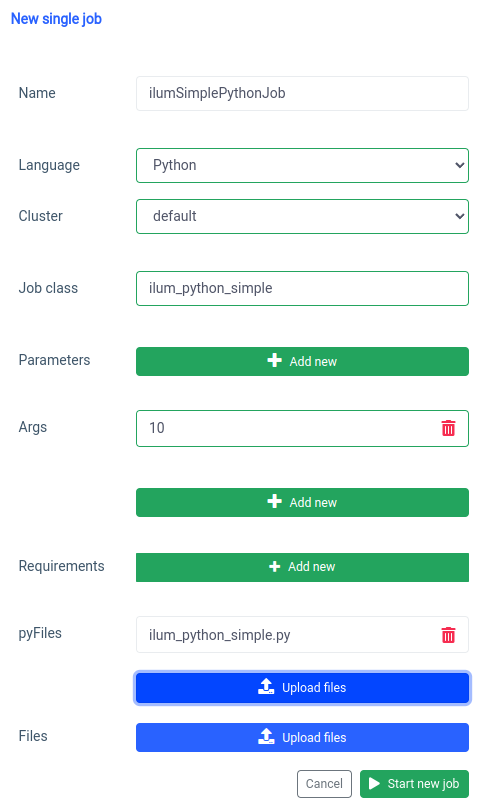
Let's start with the UI with the single job feature.
We can achieve the same thing with the API, but first, we need to expose ilum-core API with port forward.
kubectl port-forward svc/ilum-core 9888:9888With the exposed port we can make an API call.
curl -X POST 'localhost:9888/api/v1/job/submit' \
        --form 'name="ilumSimplePythonJob"' \
        --form 'clusterName="default"' \
        --form 'jobClass="ilum_python_simple"' \
        --form 'args="10"' \
        --form 'pyFiles=@"/path/to/ilum_python_simple.py"' \
        --form 'language="PYTHON"'
API call
As a result, we will receive the id of the created job.
{"jobId":"20230724-1154-m78f3gmlo5j"}Result
To check the logs of the job we can make an API call to
curl localhost:9888/api/v1/job/20230724-1154-m78f3gmlo5j/logsAPI call
And that's it! You've written and run a simple Python Spark job on Ilum. Let's look at a little more advanced example which needs additional Python libraries.
1.2 Job example with numpy.
In this section, we'll go over a practical example of a Spark job written in Python. This job involves reading a dataset, processing it, training a machine learning model on it, and saving the predictions. We're going to use a Tel-churn.csv file, which you can find in our GitHub repository. To make things easy, we've uploaded this file to a bucket named ilum-files in the build-in instance of MinIO, which is automatically accessible from the Ilum instance. This means you won't have to worry about configuring any accesses for this example - Ilum has got it covered. However, if you ever want to fetch data from a different bucket or use Amazon S3 in your own projects, you'll need to configure the accesses accordingly.
Now that we've got our data ready, let's get started with writing our Spark job in Python. Here is the full code example:
from pyspark.sql import SparkSession
from pyspark.ml import Pipeline
from pyspark.ml.feature import StringIndexer, VectorAssembler
from pyspark.ml.classification import LogisticRegression

if __name__ == "__main__":

    spark = SparkSession \
        .builder \
        .appName("IlumAdvancedPythonExample") \
        .getOrCreate()

    df = spark.read.csv('s3a://ilum-files/Tel-churn.csv', header=True, inferSchema=True)

    categoricalColumns = ['gender', 'Partner', 'Dependents', 'PhoneService', 'MultipleLines', 'InternetService',
                          'OnlineSecurity', 'OnlineBackup', 'DeviceProtection', 'TechSupport', 'StreamingTV',
                          'StreamingMovies', 'Contract', 'PaperlessBilling', 'PaymentMethod']

    stages = []

    for categoricalCol in categoricalColumns:
        stringIndexer = StringIndexer(inputCol=categoricalCol, outputCol=categoricalCol + "Index")
        stages += [stringIndexer]

    label_stringIdx = StringIndexer(inputCol="Churn", outputCol="label")
    stages += [label_stringIdx]

    numericCols = ['SeniorCitizen', 'tenure', 'MonthlyCharges']

    assemblerInputs = [c + "Index" for c in categoricalColumns] + numericCols
    assembler = VectorAssembler(inputCols=assemblerInputs, outputCol="features")
    stages += [assembler]

    pipeline = Pipeline(stages=stages)
    pipelineModel = pipeline.fit(df)
    df = pipelineModel.transform(df)

    train, test = df.randomSplit([0.7, 0.3], seed=42)

    lr = LogisticRegression(featuresCol="features", labelCol="label", maxIter=10)
    lrModel = lr.fit(train)

    predictions = lrModel.transform(test)

    predictions.select("customerID", "label", "prediction").show(5)
    predictions.select("customerID", "label", "prediction").write.option("header", "true") \
        .csv('s3a://ilum-files/predictions')

    spark.stop()
Let's dive into the code:
from pyspark.sql import SparkSession
from pyspark.ml import Pipeline
from pyspark.ml.feature import StringIndexer, VectorAssembler
from pyspark.ml.classification import LogisticRegression
Here, we're importing the necessary PySpark modules to create a Spark session, build a machine learning pipeline, preprocess the data, and run a Logistic Regression model.
spark = SparkSession \
    .builder \
    .appName("IlumAdvancedPythonExample") \
    .getOrCreate()
We initialize a SparkSession, which is the entry point to any functionality in Spark. This is where we set the application name that will appear on the Spark web UI.
df = spark.read.csv('s3a://ilum-files/Tel-churn.csv', header=True, inferSchema=True)
We're reading a CSV file stored on an minio bucket. The header=True option tells Spark to use the first row of the CSV file as headers, while inferSchema=True makes Spark automatically determine the data type of each column.
categoricalColumns = ['gender', 'Partner', 'Dependents', 'PhoneService', 'MultipleLines', 'InternetService',
                      'OnlineSecurity', 'OnlineBackup', 'DeviceProtection', 'TechSupport', 'StreamingTV',
                      'StreamingMovies', 'Contract', 'PaperlessBilling', 'PaymentMethod']
We specify the columns in our data that are categorical. These will be transformed later using a StringIndexer.
stages = []

for categoricalCol in categoricalColumns:
    stringIndexer = StringIndexer(inputCol=categoricalCol, outputCol=categoricalCol + "Index")
    stages += [stringIndexer]
Here, we're iterating over our list of categorical columns and creating a StringIndexer for each. StringIndexers encode categorical string columns into a column of indices. The transformed index column will be named as the original column name appended with "Index".
numericCols = ['SeniorCitizen', 'tenure', 'MonthlyCharges']

assemblerInputs = [c + "Index" for c in categoricalColumns] + numericCols
assembler = VectorAssembler(inputCols=assemblerInputs, outputCol="features")
stages += [assembler]
Here we prepare the data for our machine learning model. We create a VectorAssembler which will take all our feature columns (both categorical and numerical) and assemble them into a single vector column. This is a requirement for most machine learning algorithms in Spark.
train, test = df.randomSplit([0.7, 0.3], seed=42)
We split our data into a training set and a test set, with 70% of the data for training and the remaining 30% for testing.
lr = LogisticRegression(featuresCol="features", labelCol="label", maxIter=10)
lrModel = lr.fit(train)
We train a Logistic Regression model on our training data.
predictions = lrModel.transform(test)

predictions.select("customerID", "label", "prediction").show(5)
predictions.select("customerID", "label", "prediction").write.option("header", "true") \
    .csv('s3a://ilum-files/predictions')
Lastly, we use our trained model to make predictions on our test set, displaying the first 5 predictions. Then we write these predictions back to our minio bucket.
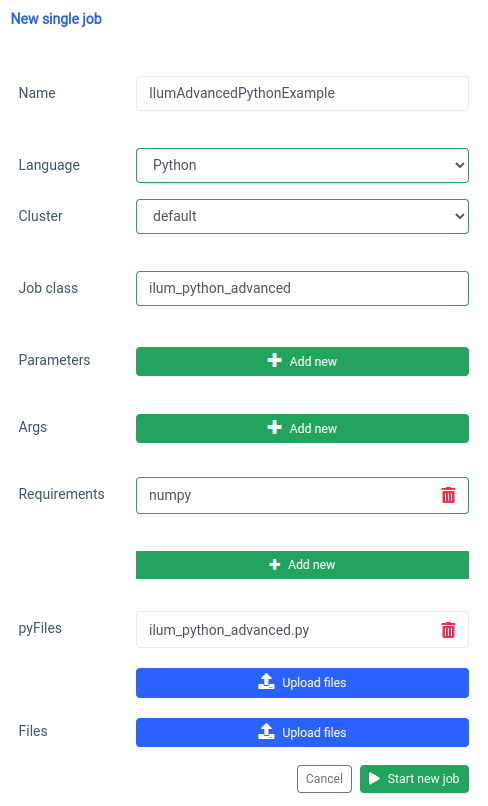
Save this script as ilum_python_advanced.py
pyspark.ml uses numpy as a dependency which is not installed as default so we need to specify it as a requirement.
And the same thing can be done through the API.
curl -X POST 'localhost:9888/api/v1/job/submit' \
        --form 'name="IlumAdvancedPythonExample"' \
        --form 'clusterName="default"' \
        --form 'jobClass="ilum_python_advanced"' \
        --form 'pyRequirements="numpy"' \
        --form 'pyFiles=@"/path/to/ilum_python_advanced.py"' \
        --form 'language="PYTHON"'
API call
In the next sections, we'll transform both Python scripts into an interactive Spark job, taking full advantage of Ilum's capabilities.
Step 2: Transitioning to Interactive Mode
Interactive mode is an exciting feature that makes Spark development more dynamic, giving you the capability to run, interact, and control your Spark jobs in real time. It's designed for those who seek more direct control over their Spark applications.
Think of Interactive mode as having a direct conversation with your Spark job. You can feed in data, request transformations, and fetch results - all in real time. This drastically enhances the agility and capability of your data processing pipeline, making it more adaptable and responsive to changing requirements.
Now that we're familiar with creating a basic Spark job in Python, let's take things a step further by transforming our job into an interactive one that can take advantage of Ilum's real-time capabilities.
2.1 SparkPi example.
To illustrate how to transition our job to Interactive mode, we will adjust our earlier ilum_python_simple.py script.
from random import random
from operator import add

from ilum.api import IlumJob


class SparkPiInteractiveExample(IlumJob):

    def run(self, spark, config):
        partitions = int(config.get('partitions', '5'))
        n = 100000 * partitions

        def f(_: int) -> float:
            x = random() * 2 - 1
            y = random() * 2 - 1
            return 1 if x ** 2 + y ** 2 <= 1 else 0

        count = spark.sparkContext.parallelize(range(1, n + 1), partitions).map(f).reduce(add)

        return "Pi is roughly %f" % (4.0 * count / n)
Save this as ilum_python_simple_interactive.py
There are just a few differences from the original SparkPi.
1. Ilum package
To start off, we import the IlumJob class from the ilum package, which serves as a base class for our interactive job.
The Spark job logic is encapsulated in a class that extends IlumJob, particularly within its run method. We can add ilum package with:
pip install ilum2. Spark job in a class
The Spark job logic is encapsulated in a class that extends IlumJob, particularly within its run method.
class SparkPiInteractiveExample(IlumJob):
    def run(self, spark, config):
        # Job logic here
Wrapping the job logic in a class is essential for the Ilum framework to handle the job and its resources. This also makes the job stateless and reusable.
3. Parameters are handled differently:
We are taking all arguments from the config dictionary
partitions = int(config.get('partitions', '5'))
This shift allows for more dynamic parameter passing and integrates with Ilum's configuration handling.
4. The result is returned instead of printed:
The result is returned from the run method.
return "Pi is roughly %f" % (4.0 * count / n)
By returning the result, Ilum can handle it in a more flexible way. For instance, Ilum could serialize the result and make it accessible via an API call.
5. No need to manually manage Spark session
Ilum manages the Spark session for us. It's automatically injected into the run method and we don't need to stop it manually.
def run(self, spark, config):
These changes highlight the transition from a standalone Spark job to an interactive Ilum job. The goal is to improve the flexibility and reusability of the job, making it more suited for dynamic, interactive, and on-the-fly computations.
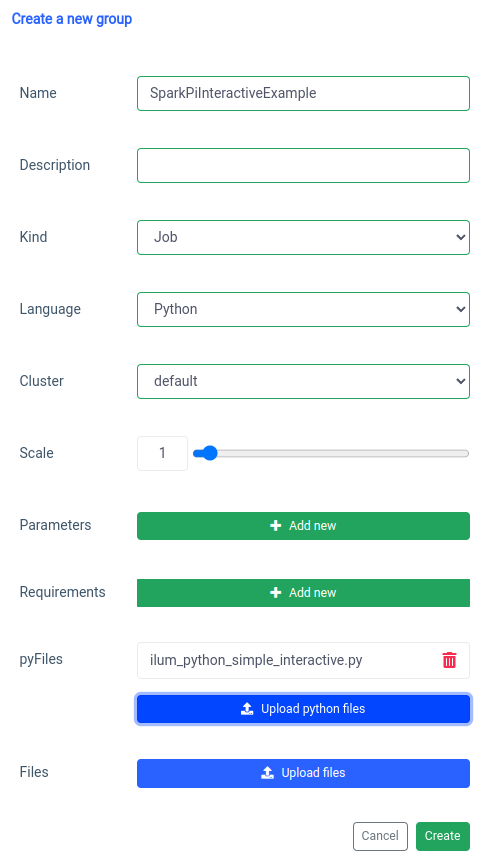
Adding interactive spark job is handled with the 'new group' function.
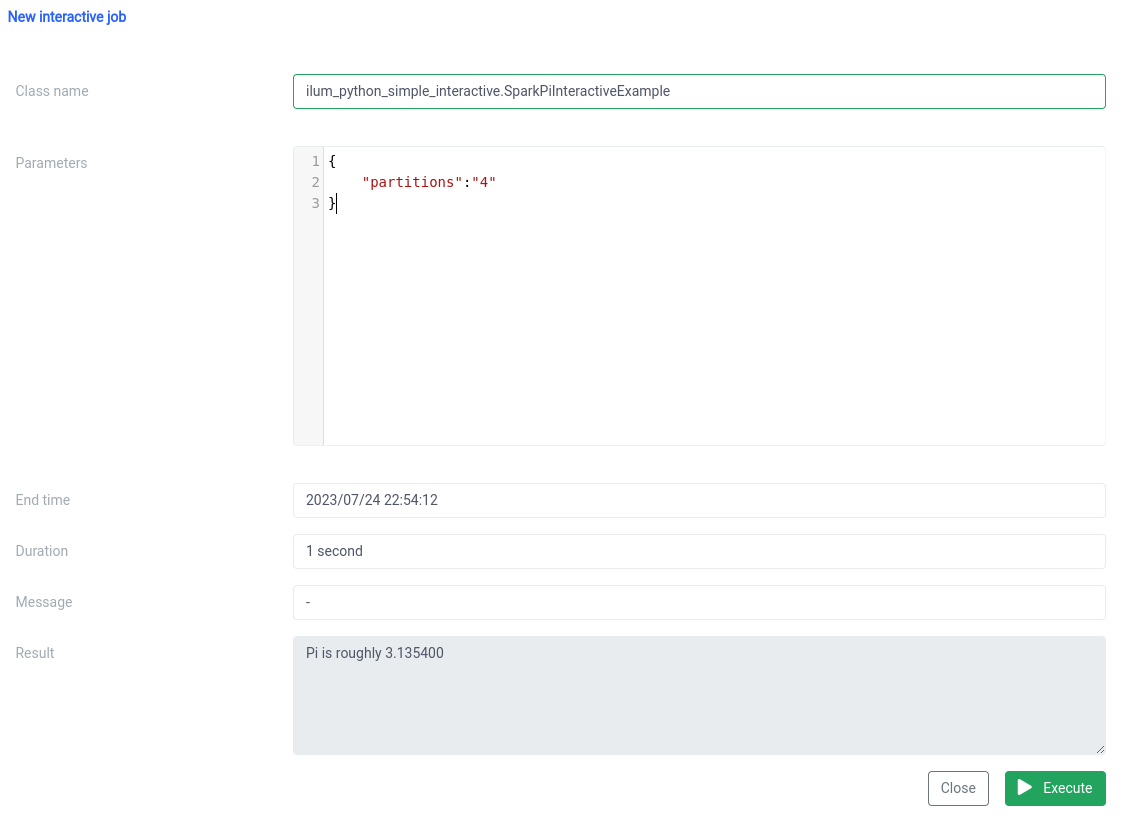
And the execution with the interactive job function on UI.
The class name should be specified as a pythonFileName.PythonClassImplementingIlumJob
We can achieve the same thing with the API.
1. Creating group
curl -X POST 'localhost:9888/api/v1/group' \
        --form 'name="SparkPiInteractiveExample"' \
        --form 'kind="JOB"' \
        --form 'clusterName="default"' \
        --form 'pyFiles=@"/path/to/ilum_python_simple_interactive.py"' \
        --form 'language="PYTHON"'
API call
{"groupId":"20230726-1638-mjrw3"}Result
2. Job execution
curl -X POST 'localhost:9888/api/v1/group/20230726-1638-mjrw3/job/execute' \
	-H 'Content-Type: application/json' \
	-d '{ "jobClass":"ilum_python_simple_interactive.SparkPiInteractiveExample", "jobConfig": {"partitions":"10"}, "type":"interactive_job_execute"}'
API call
{
   "jobInstanceId":"20230726-1638-mjrw3-a1srahhu",
   "jobId":"20230726-1638-mjrw3-wwt5a",
   "groupId":"20230726-1638-mjrw3",
   "startTime":1690390323154,
   "endTime":1690390325200,
   "jobClass":"ilum_python_simple_interactive.SparkPiInteractiveExample",
   "jobConfig":{
      "partitions":"10"
   },
   "result":"Pi is roughly 3.149400",
   "error":null
}
Result
2.2 Job example with numpy.
Let's look at our second example.
from pyspark.sql import SparkSession
from pyspark.ml import Pipeline
from pyspark.ml.feature import StringIndexer, VectorAssembler
from pyspark.ml.classification import LogisticRegression
from ilum.api import IlumJob
class LogisticRegressionJobExample(IlumJob):
def run(self, spark_session: SparkSession, config: dict) -> str:
df = spark_session.read.csv(config.get('inputFilePath', 's3a://ilum-files/Tel-churn.csv'), header=True,
inferSchema=True)
categoricalColumns = ['gender', 'Partner', 'Dependents', 'PhoneService', 'MultipleLines', 'InternetService',
'OnlineSecurity', 'OnlineBackup', 'DeviceProtection', 'TechSupport', 'StreamingTV',
'StreamingMovies', 'Contract', 'PaperlessBilling', 'PaymentMethod']
stages = []
for categoricalCol in categoricalColumns:
stringIndexer = StringIndexer(inputCol=categoricalCol, outputCol=categoricalCol + "Index")
stages += [stringIndexer]
label_stringIdx = StringIndexer(inputCol="Churn", outputCol="label")
stages += [label_stringIdx]
numericCols = ['SeniorCitizen', 'tenure', 'MonthlyCharges']
assemblerInputs = [c + "Index" for c in categoricalColumns] + numericCols
assembler = VectorAssembler(inputCols=assemblerInputs, outputCol="features")
stages += [assembler]
pipeline = Pipeline(stages=stages)
pipelineModel = pipeline.fit(df)
df = pipelineModel.transform(df)
train, test = df.randomSplit([float(config.get('splitX', '0.7')), float(config.get('splitY', '0.3'))],
seed=int(config.get('seed', '42')))
lr = LogisticRegression(featuresCol="features", labelCol="label", maxIter=int(config.get('maxIter', '5')))
lrModel = lr.fit(train)
predictions = lrModel.transform(test)
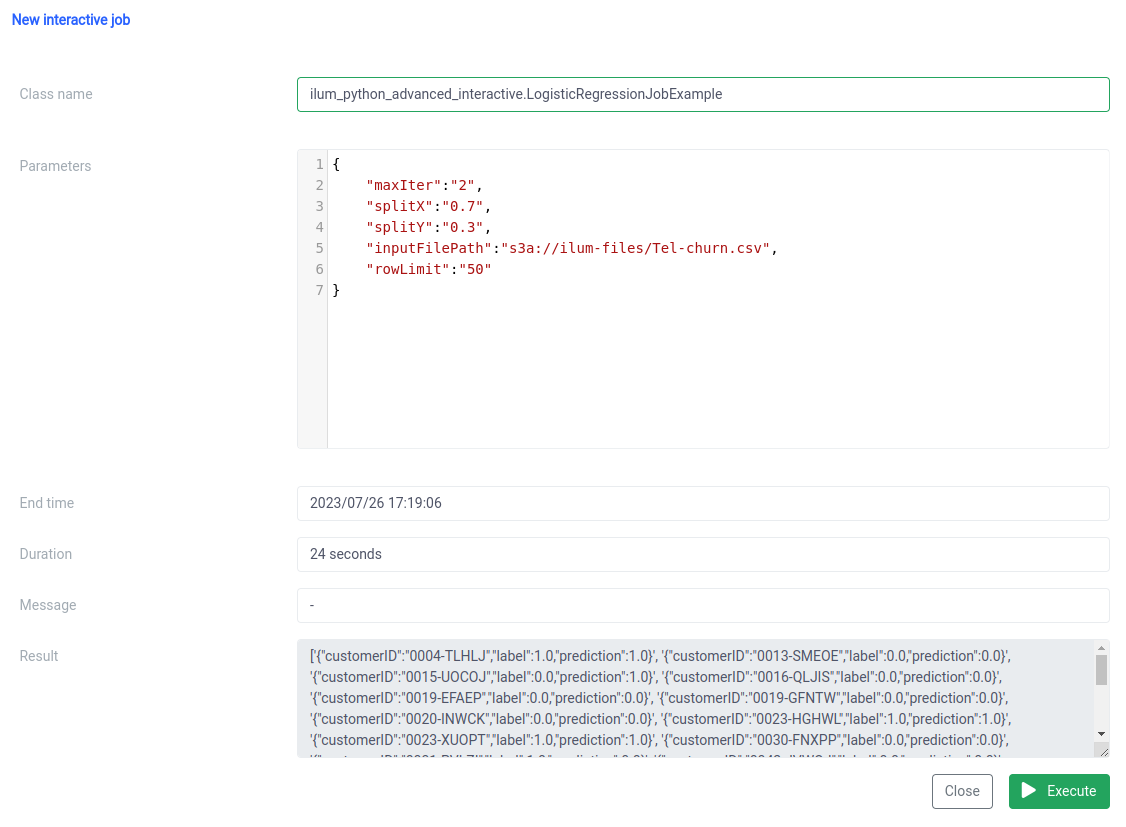
return '{}'.format(predictions.select("customerID", "label", "prediction").limit(
int(config.get('rowLimit', '5'))).toJSON().collect())
1. We wrap the job in a class, just like in the previous example:
class LogisticRegressionJobExample(IlumJob):
    def run(self, spark_session: SparkSession, config: dict) -> str:
        # Job logic here
Again, the job logic is encapsulated in the run method of a class extending IlumJob, helping Ilum to handle the job efficiently.
2. All parameters, including those for the data pipeline (like file paths and Logistic Regression hyperparameters), are obtained from the config dictionary:
df = spark_session.read.csv(config.get('inputFilePath', 's3a://ilum-files/Tel-churn.csv'), header=True, inferSchema=True)
train, test = df.randomSplit([float(config.get('splitX', '0.7')), float(config.get('splitY', '0.3'))], seed=int(config.get('seed', '42')))
lr = LogisticRegression(featuresCol="features", labelCol="label", maxIter=int(config.get('maxIter', '5')))
By centralizing all parameters in one place, Ilum provides a uniform, consistent way of configuring and tuning the job.
The result of the job, rather than being written to a specific location, is returned as a JSON string:
return '{}'.format(predictions.select("customerID", "label", "prediction").limit(int(config.get('rowLimit', '5'))).toJSON().collect())
This allows for more dynamic and flexible handling of the job result, which could then be processed further or exposed via an API, depending on the needs of the application.
This code perfectly showcases how we can seamlessly integrate PySpark jobs with Ilum to enable interactive, API-driven data processing pipelines. From simple examples like Pi approximation to more complex cases like Logistic Regression, Ilum's interactive jobs are versatile, adaptable, and efficient.
Step 3: Making Your Spark Job a Microservice
Microservices bring in a paradigm shift from the traditional monolithic application structure to a more modular and agile approach. By breaking down a complex application into small, loosely coupled services, it becomes easier to build, maintain, and scale each service independently based on specific requirements. When applied to our Spark job, this means we could create a robust data processing service that could be scaled, managed, and updated without affecting other parts of our application stack.
The power of turning your Spark job into a microservice lies in its versatility, scalability, and real-time interaction capabilities. A microservice is an independently deployable component of an application that runs as a separate process. It communicates with other components via well-defined APIs, giving you the freedom to design, develop, deploy, and scale each microservice independently.
In the context of Ilum, an interactive Spark job can be treated as a microservice. The job's 'run' method acts as an API endpoint. Each time you call this method via Ilum's API, you're making a request to this microservice. This opens up the potential for real-time interactions with your Spark job.
You can make requests to your microservice from various applications or scripts, fetching data, and processing results on the fly. Moreover, it opens up an opportunity to build more complex, service-oriented architectures around your data processing pipelines.
One key advantage of this setup is scalability. Through the Ilum UI or API, you can scale your job (microservice) up or down based on the load or the computational complexity. You don't need to worry about manually managing resources or load balancing. Ilum’s internal load balancer will distribute API calls between instances of your Spark job, ensuring efficient resource utilization.
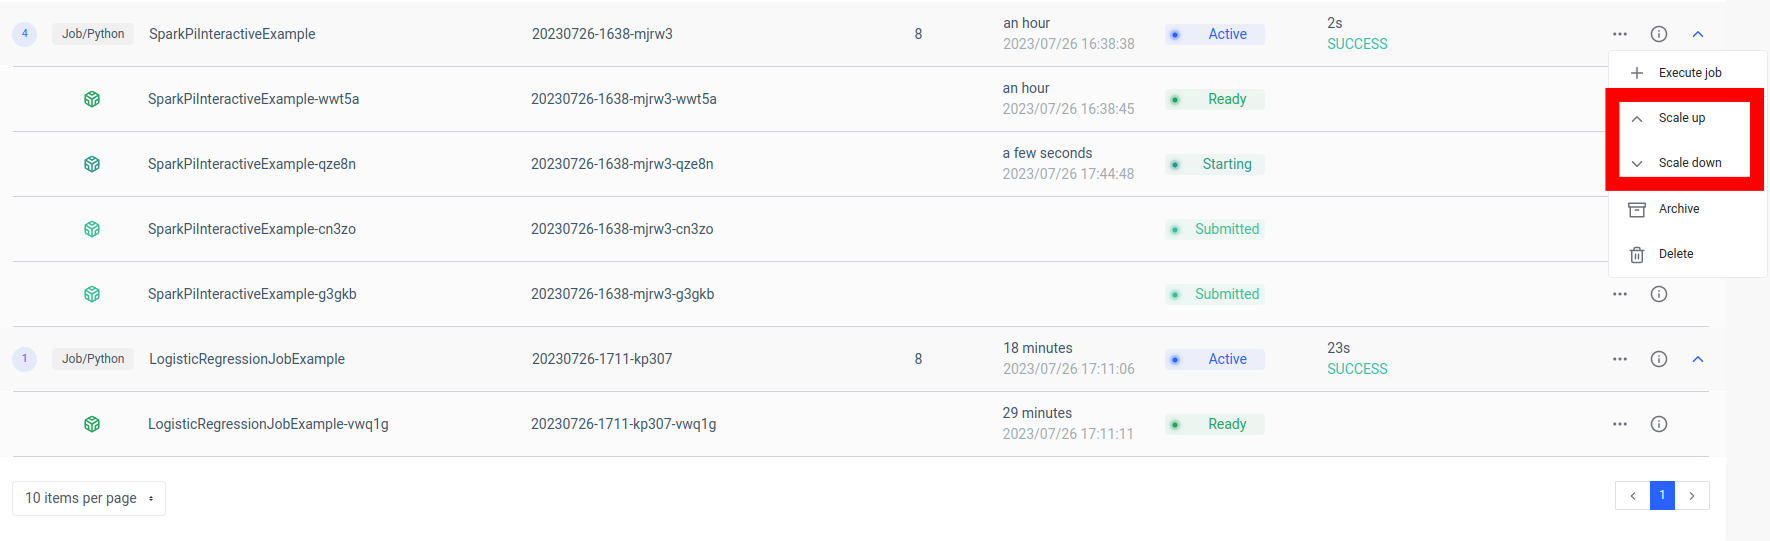
Keep in mind that the actual processing time of the job depends on the complexity of the Spark job and the resources allocated to it. However, with the scalability provided by Kubernetes, you can easily scale up your resources as your job's requirements grow.
This combination of Ilum, Apache Spark, and microservices brings about a new, agile way to process your data - efficiently, scalably, and responsively!

The Game-Changer in Data Microservice Architecture
We've come a long way since we started this journey of transforming a simple Python Apache Spark job into a full-blown microservice using Ilum. We saw how easy it was to write a Spark job, adapt it to work in interactive mode, and ultimately expose it as a microservice with the help of Ilum's robust API. Along the way, we leveraged the power of Python, the capabilities of Apache Spark, and the flexibility and scalability of Ilum. This combination has not only transformed our data processing capabilities but also changed the way we think about data architecture.
The journey doesn't stop here. With full Python support on Ilum, a new world of possibilities opens up for data processing and analytics. As we continue to build and improve on Ilum, we're excited about the future possibilities that Python brings to our platform. We believe that with Python and Ilum together, we're just at the beginning of redefining what's possible in the world of data microservice architecture.
Join us on this exciting journey, and let's shape the future of data processing together!